
How To Make Marbled Paper or Marbled Fabric
Note: This page includes affiliate links, see my disclosures here.

The technique of painting by floating and suspending colorful pigments in liquid has been used for centuries upon centuries, across continents, in a variety of ways. In Venice, Italy, for example, it was done by skilled artisans to embellish books. I like to think that the shallow, thick water of the Venetian lagoon inspired the technique, especially considering that the suspension solution is made of an edible seaweed-derived compound. Marbling, or “ebru,” was similarly used in the Ottoman Empire and is now a beloved children’s craft activity in modern-day Turkey.
Want to learn how to make a macramé plant hanger? Take our online macramé plant hanger course here. If you want to create with your friends, book a private craft party.
Your children’s fingers will get dirty, and this takes a short amount of preparation over 3-4 days. But that’s what makes it fun. Here’s how you marble.
You can marble anything, but the most common uses are with fabric and paper. You just need to ensure two things: first, you must have a shallow dish into which you can fully lay the fabric or paper flat; second, you need to prepare the surface 24-28 hours in advance so that it dries before you start. Think carefully about the type of surface you want to marble. Anything with a slippery, overly absorbent, or treated surface may not take the pigment well. For fabric, wash it first to remove any sizing. I’ve used linen for linen napkins, but I hear that silk works great as well (a marbled silk scarf? Yes please.) For paper, I use Strathmore printmaking paper and cut it to the desired size.
For your marbling adventure, I recommend purchasing a marbling kit from an art or craft supply retailer. I use Jacquard’s kit, which comes with the right proportions of the necessary ingredients. You are embarking on a creative chemistry class with this craft, and these kits take out a lot of the guesswork.
Ok, now that you know the hidden secrets, it’s time to get to work.

What you need:
Something to marble. For fabric, try white linen napkins or silk scarves. For paper, try printmaking or watercolor paper cut to the size you want for cards.
—Alum
—Carrageenan (the seaweed I mentioned!)
—Paints
—A shallow tray that will completely fit the item you are marbling as it lays flat
—Bobby pins, combs, eye droppers, paintbrush, toothpicks, a white plastic plate or palette
—Clothespins and a string or a drying rack
—A drop cloth
—Consider jugs with tight lids, a bucket, and possibly a funnel for transportation
Step One: Prepare Your Surface
For fabric, wash and dry the fabric either in your washing machine with detergent, or by hand washing with woolite. Iron once dry. Then, whisk 2 tsp. of alum into 1 gallon of hot tap water, and soak the fabric for 20-30 minutes. Hang to dry fully and marble within 48 hours.
For paper, whisk 2 tsp. of alum into 1 gallon of hot tap water, and pour the solution into a tray or pot large enough for your paper to lay flat. Fully submerge the paper, one piece at a time, and soak for 20-30 minutes. You can layer them as long as you do so one by one. I used jars to weight the paper down. Hang to dry fully and marble within 48 hours.
Try to avoid using the tray you plan to marble with as the tray to soak your fabric or paper in, because the alum and carrageenan react in a detrimental way. If you must, wash the alum tray with hot soapy water and fully dry it before adding the carrageenan solution.
Step Two: Prepare the Marbling Solution
In a large bowl or pot (I use a stock pot), measure 2 Tbsp of carrageenan then pour over one gallon of hot tap water. Whisk for 10 minutes, then cover and allow to sit for 8-12 hours. There will be chunks left over after whisking, but they will dissolve on their own as they sit. I recommend mixing with the whisk again approximately one hour before marbling, then right before you pour the solution. The solution will keep on the shelf for 24 hours, but it should be refrigerated if you can’t use it in the next day or two. In the fridge it can for up to one week.
*Oddly, these ingredients are food safe. Both alum and carrageenan are ingredients used in food processing, as a pickling agent and food thickener, respectively. So don’t feel guilty about using your cookware. I wash it all up with Dawn right away so it doesn’t get too sticky.
Step Three: Mise-en-Place your Marbling Station
Cover the table or counter on which you will be working with a drop cloth. Place your tray in the middle, paints and implements to the right, plate or paint palette to the right of that, and treated paper at the furthest right. Leave a fair amount of space to the left of the tray where you can place the marbled paper to dry. (Lefties might want to invert this.)
Step Four: Marble Away

Pour the carrageenan solution into your marbling tray. Ideally, you will have approximately one inch of solution and approximately 1/4-1/2 inch of space between the top of the solution and the top of the tray. To remove bubbles, skim the surface of the solution with a piece of regular paper or newsprint.
Add drops of paint from the paint bottles onto the solution. They will spread like circles. Have some fun sporadically dropping different colors that you want on your finished piece, watching how some of the paints go to the side and some stay prominently in the middle, based on weight. You can also use a paintbrush to spatter the surface with smaller dots. This is called the Stone Pattern
Decide what kind of marbled pattern you want - circles, long lines, or thin combed lines. Use a Bobby pin or thin stick to “draw” in the solution, moving the paint from the Stone Pattern around however you like. Here are a few traditional techniques:
— Snail Pattern: Draw little spirals systematically all over the surface of the solution.
— Get-gel: Turkish for “come and go” or “back and forth.” Draw up and down across the surface of the solution. If you’re feeling bold, do the same thing at 90 degrees on top of the original pattern.
— Rake Nonpareil: Draw the get-gel through the Stone Pattern, then take a comb and comb across the surface.
Experiment with different drawing techniques, by mixing your own colors using the palette and adding those with an eye-dropper, and by splattering paint with a brush. The paints will continue to drift, so when you have a design you like, work quickly to print the image.

Step Five: Print onto Paper or Fabric
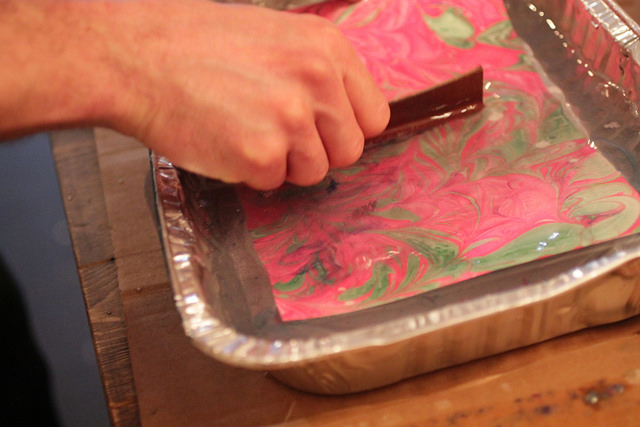
When you’re ready and your design extends the full size of your printing surface (paper or fabric), gently lay your surface directly onto the top of the marbled solution. Lay the middle of the surface onto the middle of the solution first, then gently press down the edges. Make sure all of the surface touches the liquid, and be careful about air bubbles -- they will end up as blank spots. Let the surface sit for a few seconds, then lift it from one corner directly up from the surface without dragging it through the liquid.
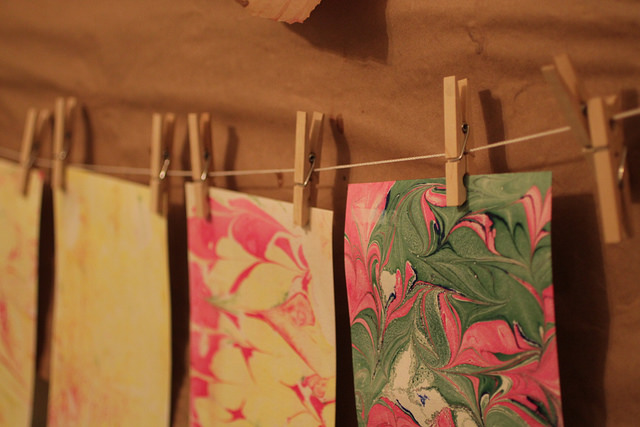
Place the surface, printed side up, flat on the drop cloth to the left. After about 20 minutes of laying flat to dry, you can hang it from a clothesline using clothes pins. If you do that too early, the carrageenan will stick to the clothes pin and tear the surface.
Step Six: Post-Processing
For Paper, let your marbled surface dry fully, at least overnight. Then, carefully rinse the sticky carrageenan off of the paper by slowly running cold water from the tap, and using your fingers to gently rub trickles of water over the surface of the paper until it is no longer slippery. Lay flat to dry, then your piece is finished!
For Fabric, carefully rinse the surface after it has dried completely through slowly running water. Let it dry for 24 hours, then heat-set the paint with an iron. Place a thin rag between the painted surface and the iron, then iron on the appropriate setting, pressing each section of the fabric for several seconds. Let the fabric cure two weeks before washing.
Step Seven: Clean Up
Everything is safe to clean in the sink. Pour the marbling solution down the sink while running hot water, and wash up your jugs, tray, brushes, etc. with hot water and dish soap. Make sure your sink is free of paint before walking away, or it will be difficult to remove when fully dry. If you’re as messy as I am, roll up that drop cloth and toss it. Spilled carrageenan will get nasty if it sits around too long.
Now you’re ready to marble! Show us your work by tagging @distillcreative, or shop my pieces, hand marbled monoprints decorated with block prints, at atthirtyone.com. Check out more of Nicole’s artwork on her Instagram @atthirtyone.

Marbled Block Print, Gold on Purple by At Thirty-One

Marbled Block Print, Silver on Orange by At Thirty-One
Further Reading:
Find these books at your local library, local book store, local book store online, or Amazon.
The Weekend Crafter: Marbling: Easy & Elegant Projects for Paper & Fabric Paperback
The Practical Guide to Marbling Paper
Suminagashi: The Japanese Art of Marbling : A Practical Guide